This is the most frustated problem I have encountered when using Asus Pro WS WRX80E-SAGE SE WIFI Motherboard Pro WS WRX80E-SAGE SE WIFI. The issue appeared when I changed the BIOS settings to enable the “SR-IOV” feature with the hope of solving USB devices not detected and avoiding adding “pci=nommconf” in GRUB.
Once, I rebooted, it suddenly its showing AMI Megatrend where everything was being initialized properly, and the last message was “ensure to connect the 8-pin power please enter setup to recover bios setting fatal error”. There is BIOS page at beginning to press F2 or Del, however it was not responsive and back to AMI page.
1 Year ago I did received the same problem, where the solution is RMA. But now, the warranty already expired. Here are the steps that I did to debugging and fix the problem.
I did clear CMOS and reset, however this problem is persistent and not going away. Here are steps that I’m doing to debug the problem
Check if PCIe beside 24 pin motherboard is attached
- Make sure the PCIE 8-pin cable is attached. Otherwise there will be red-LED will appear.
- There are 2x slot of 6-pin PCIe power on the bottom. However, the error is not related to this. I tried to give power but did not solve the problem.
Check all devices and start with minimum
- Only use 1 stick of RAM, this is to minimize the coverage of problem that caused by memory issue
- Use only 1 GPU (just in case you have multiple GPUs)
The solution!
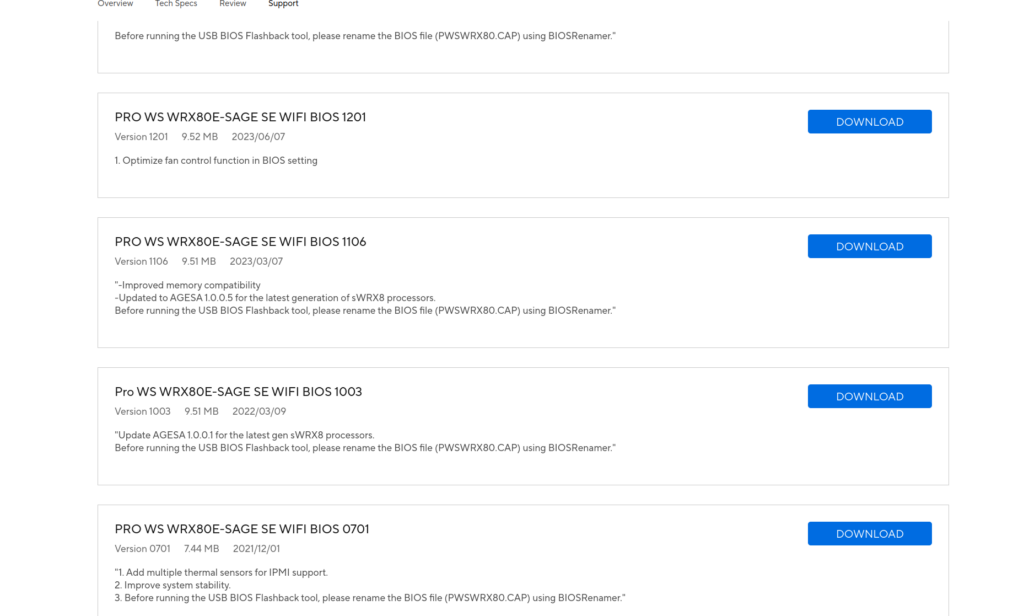
Re-installing the BIOS is solving this problem. In my case, I did downgrade bios to 1003. Here are the steps
- Boot to any Windows (PC/Laptop) and format an USB sticks into FAT32
- Download BIOS 1003 from ASUS page
- Extract and execute the renamer-execution file, which it will rename the BIOS file
- Put this into BIOS USB slot at back of motherboard (there is marker called “bios”)
- Turning off your motherboard. Keep the PSU power on. (The power-indicator light is on).
- Starting the BIOS flash by hold the “BIOS” button for 3 seconds until you see the blue light blinking
- Do not do anything. Don’t press clear CMOS. Don’t unplug power. Just don’t do anything, let the BIOS doing it process
- When its stop blinking, its mean the process is completed
After-math
Now, you can turn on your computer. Make sure you have keyboard and mouse USB attached. You will see AMI page and say “New CPU detected, Press F1 to Setup, etc”. Congrats! you solve the problem.
For me, The AMI page was not responsive. Apparently the issue is my keyboard is not working on AMI page. I switch with another keyboard, change USB slot and now responsive!