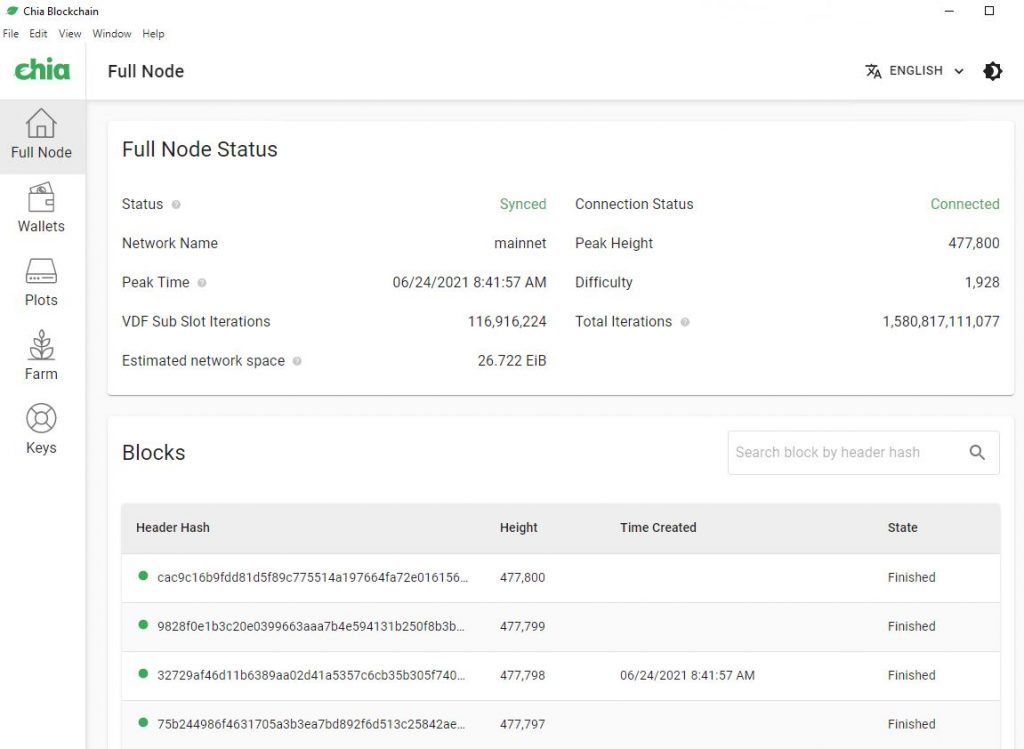
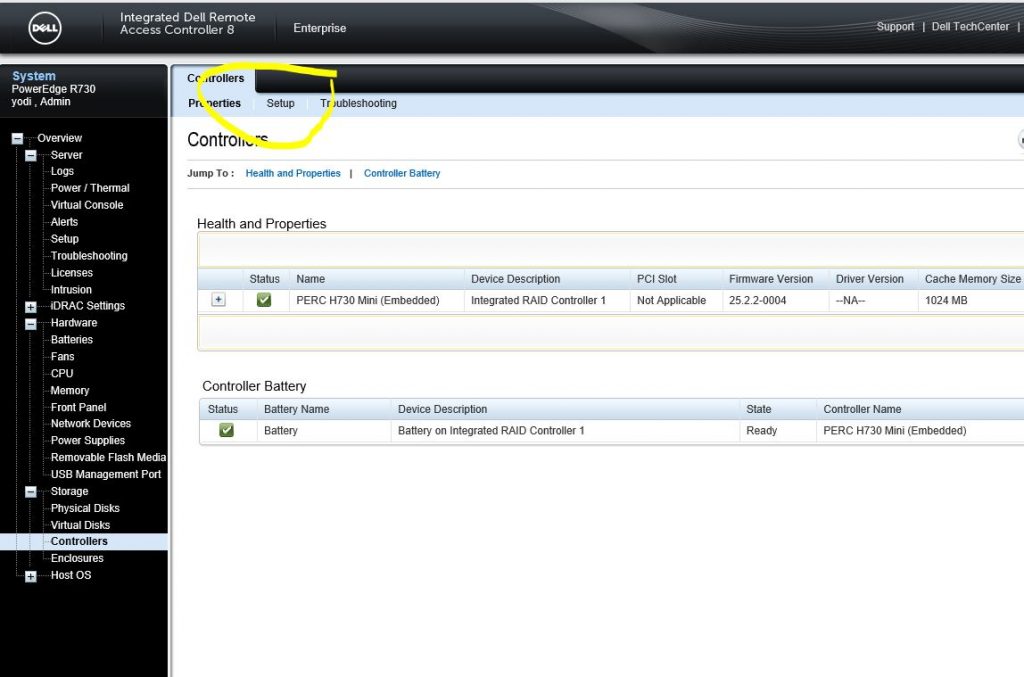
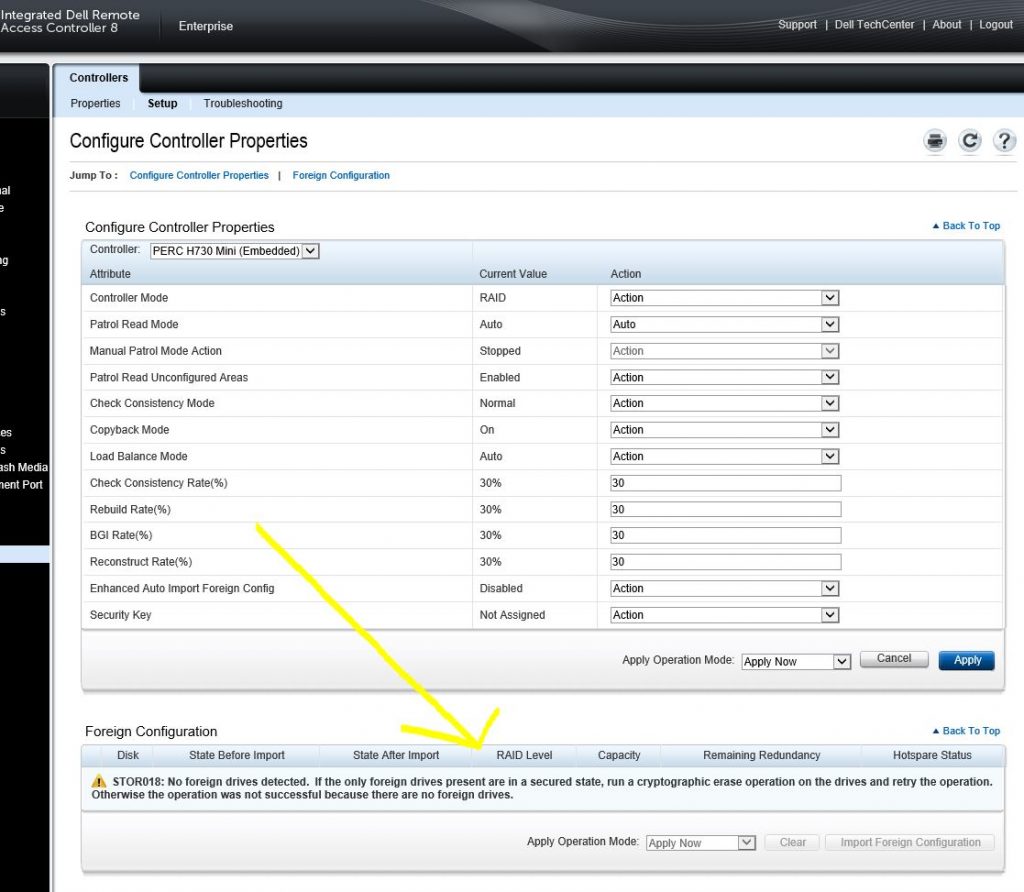
Often we want to know who others IP address that currently send ping to our server. To detect this, can use this script
sudo tcpdump -i <YOUR-ETH-DEVICE) icmp and icmp[icmptype]=icmp-echo
#sudo tcpdump -i eth2 icmp and icmp[icmptype]=icmp-echo

Often we want to know who others IP address that currently send ping to our server. To detect this, can use this script
sudo tcpdump -i <YOUR-ETH-DEVICE) icmp and icmp[icmptype]=icmp-echo
#sudo tcpdump -i eth2 icmp and icmp[icmptype]=icmp-echo
If you want to mount your shared partition or folder in Windows 10 to be accessible from Ubuntu server, you can use CIFS. Here is the step
sudo mount -t cifs -o user=YOUR-UBUNTU-USERNAME,username=YOUR-WINDOWS-USERNAME,password=YOUR-WINDOWS-PASSWORD,dir_mode=0777,file_mode=0777 //YOUR-WINDOWS-IP-ADDRESS/PATH-FOLDER /media/MOUNT-PATH
Harvesters works as connecting the plots into Farmer via SSL remotely. Single harvesters can contains many plots. And yes, many harvesters can connect to single Farmer, which easier for you decouple from storage depedencies.
If you confuse what is Farmer? This is what farmer looks like
This is the main software that you are running to farming your plots. Farmer must only works in single machine as your only gateway to Chia Network.
Next, what is Harvester? It’s services that running separately than Main software. Ideally, you run this service into separate machine where you store your plots.
So, imagine I have main machine that maximum 20TB capacities and running the Farmer. Also, I have another machine with 120TB plots storage and connected via LAN to the main machine.
Usually, you can share folder so main machine can access the storage. With harvester, you can avoid the hassle in giving permission and make it more secure. This are the step to do it
Suddenly I see this Windows 10 Blue screen of Death “Driver Power Failure” often. No idea why this appear because seems my hardware is fine. To solve this problem, we can do three steps:
First, do the scan health and restore health. Go to Windows Menu -> Open command prompt -> using Administrator mode
Then go type
DISM.exe /Online /Cleanup-image /scanhealth
DISM.exe /Online /Cleanup-image /Restorehealth
This step should 80% fixing your problem. To handle another edge cases, you can disable power trigger to your system.
Second, go to Device Manager by right click Windows Start Menu. Go to Network Adapter, choose you Ethernet -> Properties -> Power Management. Then disable the Allow the computer to turn off this device to save power.
When you remove the HDD from the bay, the log will be showing information like :
Drive 4 is removed from disk drive bay 1. |
When we put back into tray, the log will be showing:
Drive 4 is installed in disk drive bay 1. |
Sometimes, the status in Storage showing foreign state. This probably the HDD is part of RAID virtualdisk that detached accidentally. To fix this issue, go to iDRAC setting.
Go to Controller
Click “Setup” Menu and scroll down to Foregin Configuration. Your hdd will be show here. Then just click import to fix it
Wireless router ASUS RT-AC59U V2 AC1500 have amazing feature called AI Mesh. Which, you can put several wireless router and connect them together as single SSID. This is super helpful feature which you doesn’t need to connect for another wifi ID that have better internet connection.
Its acting literally like our GSM smartphone signal. While we are moving, our phone being transferred from one tower to another tower, without need to see unique ID of each tower.
In simple way, you can make extension or repeater of your wireless without need to use any LAN cable to connect both wifi. Meanwhile, still under single SSID.
To enable AI Mesh is super easy. If you have two ASUS router that support AI Mesh, here are the steps:
Enjoy!
We can control Ubuntu desktop similar like Windows RDP, which all mouse movement and application is sync and same with the user login in the PC / laptop. We will login similar as graphical desktop.
If you want to have the same experience mirror like Windows Remote Desktop, then you can install install and use X11VNCServer.
sudo apt-get install x11vnc
x11vnc -storepasswd
x11vnc -usepw
Then, you can create a file execution “x11.sh” via SSH or directly to the host PC/Laptop/Server
#!/bin/bash
x11vnc -xkb -noxrecord -noxfixes -noxdamage -safer -forever -display :0 -bg -o /home/YOUR-USERNAME/x11.log
Then you just execute this with
sh x11.sh
To start connect with your Ubuntu Remote Desktop, you can use several VNC client. My recommendation is https://www.realvnc.com/en/connect/download/viewer/
To make your app development in Android devices easier, you can deploy or debug your application via Wifi (Wireless). It’s way easier to scale rather have multiple devices connected via USB cable on a single laptop.
Even better, this approach is very effective when you need to manage multiple devices together remotely. But, at the first step, you need to connect your Android devices to your laptop via USB cable.
This is the guidelines on how to do adb connect
to multiple devices via wireless network. You can also assign multiple IP into same adb server. Or even you can use the same IP with different ports and different devices.
λ adb devices
List of devices attached
9886334a5350534332 device
Restart into tcpip mode
λ adb tcpip 5555
restarting in TCP mode port: 5555
Detach from usb and now connect
adb connect 192.168.100.81:5555
connected to 192.168.100.81:5555
1. Check connected devices
Connect your devices via USB cable then execute adb devices
via command prompt, You should your devices already connected.
adb devices
List of devices attached
RR8M20XXXX device
192.168.1.81:5555 device
In this example, I’ve one device connected to USB and another already via remote attached to local IP network.
There are several ways to copy questions in Metabase. The first one, is through saving feature by open the question, edit the SQL and choose save. If you want to do in bulk, this maybe tedious. Another alternative solution is by using Metabase API.
Here is how we can copy questions in Metabase in bulk
In [1]: from metabase_api import Metabase_API
In [2]: mb = Metabase_API('http://localhost:3000', 'username', 'password')
In [13]: mb.copy_card(source_card_name='Question1', source_collection_id=<your_source_collection_id>, destination_collection_id=<your_collection_destination_id>, destination_card_name="NewQuestion")
For more detail API about how to copy, you can check the source code below:
def copy_card(self, source_card_name=None, source_card_id=None,
source_collection_name=None, source_collection_id=None,
destination_card_name=None,
destination_collection_name=None, destination_collection_id=None,
postfix='', verbose=False):
"""Copy the card with the given name/id to the given destination collection.
Keyword arguments:
source_card_name -- name of the card to copy (default None)
source_card_id -- id of the card to copy (default None)
source_collection_name -- name of the collection the source card is located in (default None)
source_collection_id -- id of the collection the source card is located in (default None)
destination_card_name -- name used for the card in destination (default None).
If None, it will use the name of the source card + postfix.
destination_collection_name -- name of the collection to copy the card to (default None)
destination_collection_id -- id of the collection to copy the card to (default None)
postfix -- if destination_card_name is None, adds this string to the end of source_card_name
to make destination_card_name
"""
### Making sure we have the data that we need
Epoch time stored with bigint format in PostgreSQL. Most of problem when converting this epoch format to date or timestamp is because we deal with time being stored in number format and integer column type.
When I’m trying to convert epoch time that stored in bigint format, I found several way ready on Stackoverflow but didn’t works. Several script like below is not working for the latest PostgreSQL 13 version.
select *, to_timestamp(time in milli sec / 1000) from mytable
SELECT TIMESTAMP WITH TIME ZONE 'epoch' + 982384720 * INTERVAL '1 second';
SELECT DATE(builds.build_created/ 1000) FROM builds;
You may trying with several approach like to_timestamp, to_date and receive several error results like :
1. Timezone not found
2. Need to cast
3. Or Operator does not exists
Some errors details eg: